

The "Walleye" pattern
When this color pattern comes into discussions among anglers, it is often said that this pattern is very productive for clear water. I know several anglers who LOVE (with the big L) this pattern and hardly use a different color, no matter whether they are trolling or casting. So a very good reason to spend some time writing an article about it.
This name "walleye" is actually a sort of "zander" that lives in lakes in The United States and Canada. We have a similar fishspecies in Europe but we call it "zander". They both look similar but they are different species. Bith look brownish with some perchbars (a different name is pike-perch but that translation isn't grammatically correct) and some gold-colored scales. You can now understand why I chose these three components for this particular walleye-pattern.
Necessary items:
- - metallic gold spray paint
- - medium dark brown spray paint
- - fluorescent orange spray paint
- - mesh and some clippers
- - a perchbar stencil (Click here)
- - silver stick-on eyes in 9mm diameter (I occasionally use chartreuse eyes as well)
The pattern explained step by step
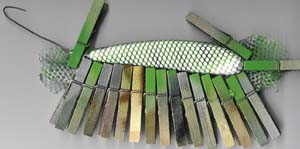 Again we start from a jerkbait that has been primed white. I use a laundry bag to cut out a rectangular shape for the mesh. The length of the rectangle is "the lure's length + 5cm" and the rectangle's width is "the height of the lure body x 3". Fold this mesh over the back of the jerkbait and fix it into place using the laundry clippers. The mesh should be tight around the lure's body because when it isn't, the scales will be fuzzy and you won't see separate scales but a gold spot with some scales in it. (view picture 1 to see how I apply the mesh to the lure)
Shake the metallic gold spray can for several minutes to mix the glitters with the gass. Place the jerkbait, which has been wrapped in the mesh, on an old newspaper. Gently spray the metallic paint on the lure's flank and pass over it with quick and thin layers of paint. It's best to wait a while between each spray. If you apply one thick layer of paint, the paint will spread underneath the mesh (the holes in the mesh hold the paint) and you will get lots of stains. Leave the jerkbait on the newspaper for a while so you allow the paint to dry. After a few minutes, turn the jerkbait over on its other flank and repeat the spraying process. Again leave it there to dry for a while and then hang it to dry using the S-shaped wire.
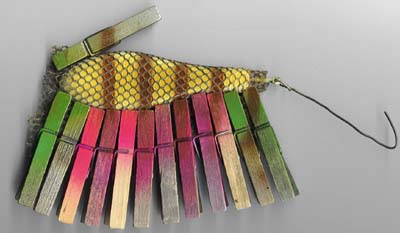 Take the can of brown spray paint and shake it really well. Again place the jerkbait on its flank on an old newspaper and place the perchbar stencil on the flank. Attention!!! The mesh is still around the lure at this stage. Spray perchbars by moving the spray can fast from the back over the flank to the belly. Use thin layers of paint and quick spray shots for the reasons mentioned above. Leave the jerkbait to dry for a while and turn it over. Repeat this process and let it dry again. Finally hang it up to dry using the S-shaped wire. Your jerkbait should look this: (view picture 2)
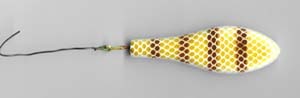
Allow the paint to dry thoroughly and remove the mesh. Your lure should look like this (view picture 3).
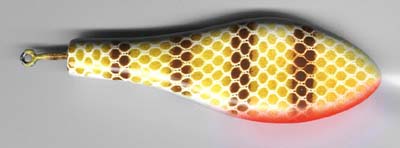
Now take the fluorescent orange paint and shake this can as well. Hold the jerkbait in front of you with the belly facing towards you. Use one quick spray shot to spray an orange throat. Let it dry for a while. This should take no more than a minute or so. Now repeat this process. This should make for one nice orange throat. Use quick and short spray shots for the best result; (view picture 4)
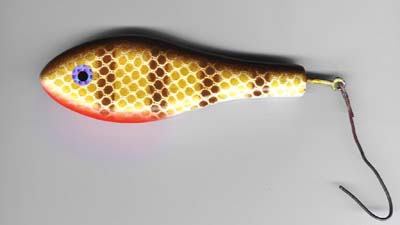
What's left is painting the back brown and applying the stick-on eyes. Hold the jerkbait in front of you again and this time with the back facing towards you. Spray brown paint on the back in one motion moving downwards and starting at the top. It's best to do this in two steps, meaning you should move over the back quite fast so the back isn't entirely covered with brown paint the first time. Let this dry for a while and then repeat it. After the second time the back should be covered completely. Several thin layers are better than one thick one! (view picture 5)
When you have finished this step, apply the stick-on eyes in such a manner that they are opposite to eachother. Now all that remains to be done is applying the lacquer. This walleye pattern is finished.
Of course this walleye pattern is but one of the many variations on this theme. I like to spray the flanks yellow first before spraying the pattern discussed above. Or I even spray the entire flanks in metallic gold paint and then I only apply the perchbars and the brown back. Or I spray the belly entirely silver instead of leaving it white and spraying an orange throat. There is much room left for experimenting yourself.
I would never be able to finish this article if I were to write down all the possibilities! If you have any questions at all about this pattern, feel free to send me an e-mail!
dirk@lurebuilding.nl.