

"Golden perch" colorpattern
This pattern is a consistent and productive color when you fish in clear waters. You can see the black perchbars and the flash of from the gold-colored flanks coming from a mile away (so to speak). Just about any jerkbait/crankbait sprayed in this color will create the illusion that a small perch is approaching! Because this pattern is darker than other perch-patterns, it looks a little more realistic. Now, lets explain how we can spray this pattern ourselves.
Necessary items:
- - low-gloss red spray paint
- - leaf-green spray paint (like the leafs of a tree)
- - gold-colored spray paint (metallic gold or low-gloss gold, …)
- - low-gloss black spray-paint
- - perchbars stencil (Clich here)
- - chartreuse stick-on eyes with a diameter of 9mm (0.35")
Painting process step by step
First of all I would like to say that we will always start froma lurebody that has been primed white when we explain different patterns. So in this explanation we will do that too. How to prime your lure white is something we will explain in one of our following articles.
Before you actually use the spray cans for painting the lures, you should shake it for at least 2 minutes so the paint and the gasses mix properly. Especially with fluorescent colors and metallic colors you may experience some problems when you don't shake it long enough. Most of the times some kind of liquid (gass that serves for transporting the paint particles) gets sprayed on your lure instead of paint or glittering particles. That is also why it is advisable to spray until the paint leaves the spray can before you spray on your lure. So shake as long as you should to get a good paint-flow.
I use spray paint from the brand Motip, but here in Belgium we have some other good brands like Duplicolor. I'm sure that in foreign countries there will be loads of other brands that are good as well. If you use a certain brand of paint to your satisfaction, please let me know and I will include that name in the list for others to see it.
Now, why do I choose low-gloss paint? First of all because it dries much quicker, thus this enables you to work faster, and because the spraying process is visible. When you use high-gloss, the paint is shiny. You can't tell by looking at the paint whether it has dried or not. It often appears dry but when you come close to the paint it sticks to your finger or you remove a spot of paint when touching the surface. You may even leave a fingerprint when the drying process is nearly finished. You have to be a patient man if you like to use high-gloss paint.
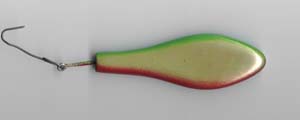
 Lets get started on this color. Take the white jerkbait in your hand and hold it up by the iron S-shaped wire that has been attached to the screw-eye. This screw-eye has been inserted for about 5mm to help you hold the lure when painting it or lacquering it. I use low-gloss gold spray paint for cars. This paint glitters a bit but hardly like most paints. I like it because it keeps your jerkbait from becoming to bright. Spray the entire lure in the gold color of your choise. Allow it to dry for a while. Use quick strokes and spray thin layers of paint. Allow to dry for about 10 minutes. This is a good average drying time for gold and silver colored spray paint. (view picture 1)
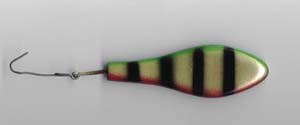
 Once you have finished this step, it's time to spray the entire belly red and the entire back green. Hold the jerkbait in front of you and grab it by the S-shaped wire. Hold the belly to you and use quick strokes or red paint from the top to the bottom. You should move your spray can downwards. Apply the paint in thin layers and wait a while between two strokes. Allow to dry and then add a second layer. This should cover the entire belly. Repeat this process for the green color on the back. (view picture 2)
Mind you: thin layers dry fast and don't cause drops to appear. Thick layers have to dry for a long period of time, and even then you don't have a garanty that the paint has fully dried. Quite often you only notice this when you apply the lacquer. The fact that the cquer hardens makes the paint contract and this shows by the appearing hair cracks in the paintjob. In the worst case scenario you even see lines of several millimetre wide of white appearing. This white is the color of the primer. So don't use thick layers! Several thin layers are best, no matter whether it's lacquer, primer or paint that you are applying.
Allow these two colors to dry thoroughly. Paint dries the fastest and the most thoroughly when the lure hangs in the wind outside and when the surrounding temperature is above 15°C. So you can guess that hot summer evenings are perfect for this. But most people prefer to build lures during the wintertime so the best thing you can do then, is hanging them to dry in near a heat-source. This can be a drying chamber, the central heating system, …
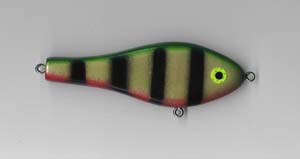
 Alright, now these colors have dried. Take an old newspaper, the perchbar stencil and the can of black spray paint. Shake it long and hard like for the other spray cans and place the jerkbait on its flank on the paper. Place the stencil on top of the flank. Use quick spray shots starting at the back of the lure and moving over the flank to the belly. Several thin layers are the best. By using this stencil, the perchbars are somewhat fluffy and this ressembles airbrush-painted perchbars. (view picture 3)
Now hang the jerkbait up to dry using the S-shaped wire. Again you can easily see when the black paint has dried. Low-gloss paint I wet when it is sprayed on the surface of a lure but when it dries the wet look disappears and it becomes low-gloss. A gentle touch of a fingertip will tell you if it has fully dried. If you use thin layers of paint, this should take no more than 5 minutes.
 Now place the jerkbait on its other flank on the newspaper and repeat the previous process. Again allow it to dry thoroughly.
When this has been finished, it's time to apply the stick-on eyes. Try to position these in such a manner that they are opposite to eachother on either flank. Of course you are free in the choice of color for these stick-on eyes, even the size is purely a personal preference. Personally I feel this color fits the best with the overall pattern. (view picture 4)
Allow this lure to dry for several days before applying the final coats of lacquer. This divani 2 in the pictures for one hasn't been lacquered yet.
If you have more questions regarding the different steps or you are experiencing problems when spraying the pattern, feel free to contact me for more information dirk@lurebuilding.nl.
Good luck! Dirk.