

The "Silver tiger" pattern
The silver tiger is a variation on the firetiger-color and it even resembles a
perch to a certain degree. Plain silver with black stripes is a good color as
well so we will try to spray a more "artistic" version of that perch pattern.
Who invented this pattern? I don't know and it really doesn't matter to us.
This pattern is said to be successful in clear and slightly colored waters due
to the high flash of the silver.
Another reason for publishing this pattern on our site, is that it's easy to
spray and the actual spraying takes very little time. Complicated patterns,
though some will follow, are not better catchers because they are difficult to
spray.
Necessary items:
- waterproof sanding paper with a grain of 400 or similar grain
- silver spray paint. Don't use chrome silver because about every lacquer
makes this shiny color into a dull one. Metallic silver will work also
- red spray paint, preferably low gloss. This is for reasons explained in
the "golden perch" pattern
- black spray paint, preferably low gloss
- chartreuse stick-on eyes
- the tigerstripes stencil (Click here)
I use Motip spray paint and stick-on eyes that are available at Moore's Lures.
These are very cheap and do the job well.
The pattern explained step by step
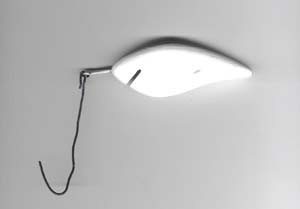
Just like in the previous two articles we start from a wooden lure that has
been primed white. Bright white is the best option because this accentuates
the colors better. All you need to do to get started is add a screw-eye to the
lure which you turn into the body for about 5mm, and a S-shaped wire to hold on
to the lure while painting it. (view picture 1)
The best thing you can do to allow the silver paint to adhere to the primer is
to roughen the surface a little with a waterproof sanding paper with a fine
grain. I use waterproof sanding paper with a grain of 400. Slightly rub it on
the lure so you won't sand away the white paint.
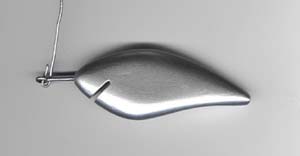
The first step is to spray the entire lure silver. Apply the paint in thin
layers. Shake the can really well and for several minutes. Silver paint has the
tendency to flow over the flanks rather than adhere to it and then you get this
pale gray look when you don't shake the spray can long enough. This is why you
need to sand the surface slightly. Use quick and short spray shots to apply the
paint to the lure. Start from above and move downwards. You will notice that
the entire lure won't be fully colored silver yet. Some parts will still be
white so wait a while to allow the paint to dry. Silver paint dries really fast
so after about 10 minutes, you can repeat the previous action. (view picture 2)
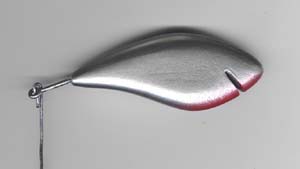 Next we take the red spray paint and we shake it well. Hang the plug upside
down with the head facing to the floor. Hold it so the lure's belly is facing
towards you and use one quick spray shot to apply a red throat of 4cm. Red
paint has a covering characteristic so the silver paint will be covered. (view
picture 3)
Never apply a hick layer of red paint because then you will get drops. You will
also risk many red paint particles appearing on the flanks. These will reduce
the silver shine. Should this happen, don't despair! Simply wait until the red
paint has fully dried. Grab your silver spray can and gently spray silver paint
on the flanks. This will cover all the red paint and you won't be able to
notice that you sprayed paint over it.
Next we take the red spray paint and we shake it well. Hang the plug upside
down with the head facing to the floor. Hold it so the lure's belly is facing
towards you and use one quick spray shot to apply a red throat of 4cm. Red
paint has a covering characteristic so the silver paint will be covered. (view
picture 3)
Never apply a hick layer of red paint because then you will get drops. You will
also risk many red paint particles appearing on the flanks. These will reduce
the silver shine. Should this happen, don't despair! Simply wait until the red
paint has fully dried. Grab your silver spray can and gently spray silver paint
on the flanks. This will cover all the red paint and you won't be able to
notice that you sprayed paint over it.
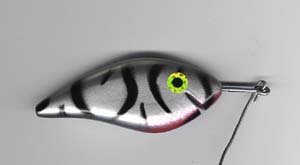 Finally we will spray the black tigerstripes. Shake the black spray paint well
and place the lure's body on an old newspaper. Position the stencil on the
flank and gently spray the black paint on the stencil. Start at the back of the
lure and move down to the belly. Use quick strokes of paint. Leave the stencil
for a while on the flank so the black paint has some time to dry. (view picture
4)
Finally we will spray the black tigerstripes. Shake the black spray paint well
and place the lure's body on an old newspaper. Position the stencil on the
flank and gently spray the black paint on the stencil. Start at the back of the
lure and move down to the belly. Use quick strokes of paint. Leave the stencil
for a while on the flank so the black paint has some time to dry. (view picture
4)
Never spray too much paint on the stencil. The stencil can't handle this and
paint will start to pour underneath it so it ruins the paintjob on the flanks.
It will start to flow underneath the stencil. Thin layers are always best.
As a finishing touch, we still need to add the stick-on eyes. In these pictures
I sprayed a 7cm crankbait and the stick-on eyes I used are 9mm in diameter. For
larger lures you can still use this size. I use 12mm diameter stick-on eyes
then.
Good luck! Dirk.