

 Toppers are surface baits that have a reasonable fat body and usually they have a propeller at the front and the back of the bait. These baits are quite popular for musky fishing and the ideal conditions in which to use them are calm days with very little wind and near dusk, when all quietens down on the lake. This surface bait originally was made by the "Southbend Tackle Company" and at present it is a real collectors item. The length of the surf-oreno's body is 4" (10cm) and it originally had a set of three treble hooks on it. Not what one would can "fish friendly" but for the sake of lurebuilding, we will make this lure with three treble hooks as well. Because not everybody has access to a woodturning lathe or has a friend who owns a lathe, I decided to build this lure from a pine wooden surface bait lure blank that is for sale at Moore's Lures. I used the version that has a hole drilled through it. This is used for through-wire systems. These lure blanks are also for sale without the drilled through hole.
Necessary items
- 1 topper lure blank from Moore's Lures
- A piece of stainless steel wire with a diameter of 1.5mm thick and about 12" (32cm long)
- 2-component glue (I use the brand 'Bison')
- Two stainless steel screw eyes of 26mm long (a touch over 1" long)
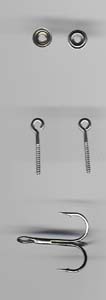
- 4 cup washer discs
- 3 size 1/0 trebles
- 2 antique propellers available at Moore's Lures. I used the nickle colored ones because I think it fits better with the redhead pattern I painted
- 2 hollow brass beads, 4mm diameter. Make sure they fit on the stainless steel wire
- A pair of bolt cutters
- A pair of combination pliers
The building process explained step by step
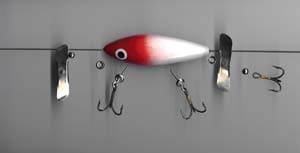
I finished the lure blank first before assembling the lure for several reasons. First I drilled the holes for the two belly treble hook hangers. Look at the picture for the exact location. Make sure the rear treble can't reach the propeller. I then painted the lure blank white and sprayed one of my favourite patterns, namely the redhead. Finally I coated the lure with a coat of epoxy lacquer (devcon). The main reason for finishing the lure first before assembling it, is this: it's a lot easier to paint the lure white, spray the color pattern and coat it with your topcoat before having glued in the wire shaft, then the other way round. If paint or lacquer gets smeared on the shaft, it may disturb the propeller and it may even prevent it from spinning at all.
Now, take the wire shaft that you cut at the right length (it's a guide line, it's not set in stone that it has to be exactly 12" long. A little more never hurt anyone!) and stick it through the hole in the lure blank. Make sure the ends on each side of the bait are about the same length. Take a pencil and mark the edge of the lure blank on the wire shaft so you can reposition it later. Mix a bit of epoxy glue in a plastic cup and apply some in both ends of the drilled hole. Use a needle to push the glue in the holes. Moving the shaft a bit (a BIT) up and down speeds up this step. Try to keep the wire shaft in place so no epoxy gets smeared on the shaft. You'll soon notice that the glue pours into the holes so you'll need a refill. Add a little more glue. Keep doing this until the glue stops flowing into the hole. We are using 5 minute epoxy so this step takes only very little time. Don't worry if you spilled epoxy on the first 1/5" or so, you can always remove the excess glue with a sharp knife. The idea for trying to keep the shaft in place is mentioned above: to make sure the propellers will spin freely.
 Seeing as we are using 5 minute epoxy glue, the shaft will be glued into position quite fast. Now allow the glue to fully harden for 24 hours. After 24 hours you can easily cut away any excess glue that may have gotten onto the wire shaft. Now take two cups washer discs and slide them onto the wire shaft, one at the nose and one at the tail end of the lure. Apply some freshly mixed epoxy glue underneath the cups and press them against the lure body. After about 5-6 minutes the glue will have hardened so you can stop pressing them against the lure body. Right now it's not necessary to wait 24 hours to allow the glue to harden so lets move on to the next step.
Take your pair of bolt cutters and a screw eye. You can see where the eye has been closed. Place the bolt cutters there and press the bolt cutters so they close. You will see that the eye opens. Open it just enough to add a treble hook to it and then close it again. Use a pair of combination pliers for that.
 Now apply a cup washer on the screw eye, add some epoxy glue to the screw eye's shaft and screw it into the lure body. Make sure that when you hold the lure by its nose, the treble hook rests with two hooks on the lure body and that one hook is faced outwards, away from the lure. Look at the pictures to see what I mean. Repeat this step for the second treble hook. Let the glue harden for 24 hours.
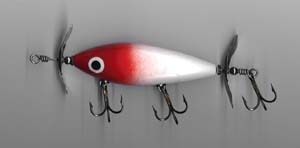
When this step is done, we are ready to make the final adjustments. Slide one hollow bead on the wire shaft at the front end of the lure and add the propeller. Form an aye in the wire shaft, about 0.5cm away from the propeller to ensure it spins freely. Repeat this step at the tail end, but first slide the propeller onto the shaft, then the hollow brass bead. Again finish with an eye formed in the wire shaft. We refer to the spinner making articles for info on how to form an eye. Look at the pictures for more details.
The surforeno is now ready for use! Good luck!!