

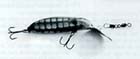
Necessary components:
- Wood type: pine, birch of willow wood
- Screws: 15 x 2 mm
- Screw-eyes: 5 x 15 mm
- Aluminum or stainless steel: 1 mm thick
- Stainless steel wire: 0.8 mm thick
Tools:
- Vice
- Rough wood file (or woodrasp)
- Knive or chisel
- A pair of small scissors
- Screwdriver
- A pair of roundnosed pliers
- A pair of combination pliers
- Key files
Building instructions:
If you want to build this cranckbait you need a piece of wood in this size: 80 mm x 20 mm x 15 mm
(look at picture 1). To get the desired shape, you will have to shape the material. Start by pressing this piece of wood in the vice and shape it with a rough file or woodrasp in order to get the rough shape. If you're skillful enough you can also get the rough shape by using a sharp knife or chisel. Please be careful with your fingers, and never cut the wood towards you, ALWAYS away from you. Those among you who have access to a lathe, have a great advantage. With a drill and some accessories you can also get the job done.
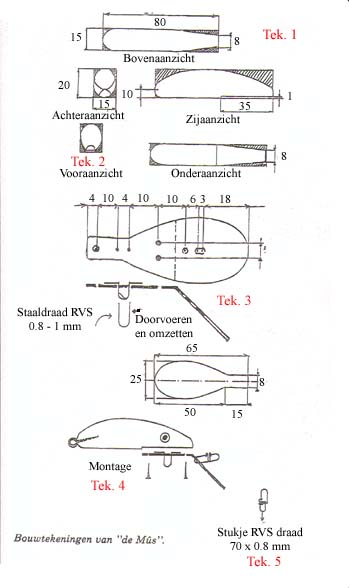 When the lure roughly has the desired shape, sand it with rough sanding paper.
After that finish off with sanding paper that has a finer grain. The bottom of the lure stays flat.
In order to do this, file an indentation of 35 mm length (measured from the front of the lure)
and approximately 1 mm deep (see picture 2). When the lure has been sanded smooth you can see the shape of a mouse. Now it's time to build the bib that creates the action and the running depth of the lure. You can build this from aluminum (for example old stove-pipes). Or you can buy a sheet of aluminum at your local hardware store. Or use stainless steel from old washing-machines. The measurements of the bib are shown in picture 3. The best way to get started is to create a stencil of it. In order to make the stencil symmetrically draw the bib on a piece of white paper.
By flipping the drawn bib over and over you can make it symmetrically
Place the bib on the aluminum or stainless steel plate. First mark the spots where the holes
should be drilled, then center with a centerpunch and drill the holes.
Don't hit it to hard while centering, especially when using aluminum.
Drill all the holes with a 2 mm drill-bit, except the two holes where the U-shaped steel wire used as an attachment eye for the first treble sticks through. They need to be drilled using a 1 mm drill-bit.
This piece of steel wire needs to be bent using a pair of roundnosed pliers (see picture 3)
After drilling the holes remove all and any sharp edges with a drill-bit that has a larger diameter than the hole.
Do this on both sides. But beware, only the sharp edges need to be removed nothing else.
Now file out the long shaped hole. You have drilled two holes of 2 mm here. File out the
dam between those two holes with a small file.
The next action is bending the bib. Place the bib in a vice where you can see the dotted line (picture 3)
and bend it with your thumbs until you reach an angle of 45°. If you want a sharper angle, place a
piece of wood against the bib at the dotted line. Take a hammer and bend it by tapping the hammer against the bib.
Make sure you place the bib straight into the vice. Otherwise the angle is out of center and that will affect the action negatively. After you finish the bib take the U-shaped piece of stainless steel wire and put it through the holes.
Bend the ends in an angle of 90° (picture 3). The diameter of these holes should be a bit larger than the thickness of the wire. Then attach the bib to the belly-side of the lure. If necessary make a small indentation for the steel wire to fit into. Apply glue to the lure's surface and to the bib and glue them together with 2 component glue which is the same as epoxy glue (picture 4). Screw the three screws in and lock the bib into its position. These small screws are usually bought in
a DIY store. Finally turn the screw-eye into the tail end of the lure.
When the lure roughly has the desired shape, sand it with rough sanding paper.
After that finish off with sanding paper that has a finer grain. The bottom of the lure stays flat.
In order to do this, file an indentation of 35 mm length (measured from the front of the lure)
and approximately 1 mm deep (see picture 2). When the lure has been sanded smooth you can see the shape of a mouse. Now it's time to build the bib that creates the action and the running depth of the lure. You can build this from aluminum (for example old stove-pipes). Or you can buy a sheet of aluminum at your local hardware store. Or use stainless steel from old washing-machines. The measurements of the bib are shown in picture 3. The best way to get started is to create a stencil of it. In order to make the stencil symmetrically draw the bib on a piece of white paper.
By flipping the drawn bib over and over you can make it symmetrically
Place the bib on the aluminum or stainless steel plate. First mark the spots where the holes
should be drilled, then center with a centerpunch and drill the holes.
Don't hit it to hard while centering, especially when using aluminum.
Drill all the holes with a 2 mm drill-bit, except the two holes where the U-shaped steel wire used as an attachment eye for the first treble sticks through. They need to be drilled using a 1 mm drill-bit.
This piece of steel wire needs to be bent using a pair of roundnosed pliers (see picture 3)
After drilling the holes remove all and any sharp edges with a drill-bit that has a larger diameter than the hole.
Do this on both sides. But beware, only the sharp edges need to be removed nothing else.
Now file out the long shaped hole. You have drilled two holes of 2 mm here. File out the
dam between those two holes with a small file.
The next action is bending the bib. Place the bib in a vice where you can see the dotted line (picture 3)
and bend it with your thumbs until you reach an angle of 45°. If you want a sharper angle, place a
piece of wood against the bib at the dotted line. Take a hammer and bend it by tapping the hammer against the bib.
Make sure you place the bib straight into the vice. Otherwise the angle is out of center and that will affect the action negatively. After you finish the bib take the U-shaped piece of stainless steel wire and put it through the holes.
Bend the ends in an angle of 90° (picture 3). The diameter of these holes should be a bit larger than the thickness of the wire. Then attach the bib to the belly-side of the lure. If necessary make a small indentation for the steel wire to fit into. Apply glue to the lure's surface and to the bib and glue them together with 2 component glue which is the same as epoxy glue (picture 4). Screw the three screws in and lock the bib into its position. These small screws are usually bought in
a DIY store. Finally turn the screw-eye into the tail end of the lure.
Painting the lure:
You can paint the lure in any color you want. Not that it matters a lot, dispite of all the expert opinions. The lure's success most often depends on our good friend pike himself. Bright colors sometimes are sometimes preferred. I like to use an aerosol can. Spray several thin layers instead of one thick layer.
Make sure the previous layer of paint has dried before applying a new layer. Before spraying a new layer sand it lightly using a sanding paper with a small grain like 400. A friend of mine doesn't bother about nice finishes. He paints his lures in silver or gold. A touch of black here and there. He lacquers the lure and that's it.
And he catches a lot of pike on them too. But I'm more of a perfectionist.
By using all sorts of attributes like the plastic mesh used to pack oranges, I spray all kinds of patterns on my lures. To get a hard finish I use a parket lacquer. I submerge the lure three to four times. This extends the lifetime of the lure considerably. A pike of some length has enormous teeth
and therefore it can penetrate the lacquer easily. The lures get moist on the inside and
start to rot. And that's a shame. You can paint eyes on the lure, but you can also buy special stick-on eyes in fishing shops.
Building the line-tie connector:
This connector is built from 70 x 0.8 mm stainless steel wire (picture 5)
Look at the picture closely and to practice you can use some thinner stainless steel wire.
After a few times you should get it right. Of course there's always the option of buying the cross-lock snap in a tackle store.
Conclusion:
The "Friesche Polder plug" is now finished. By bending the bib a little you can
influence the action of the lure. The lure you just made has a fish-calling action and
has lured a lot of pike already.
Good luck lurefishermen!
Dirk de Boer
Source: Hengelsportnieuws en Poask Hengelsport